Welcome to the Retro EZ Online Store
DIY Raspberry Pi 4 Desktop Case with OLED Stats
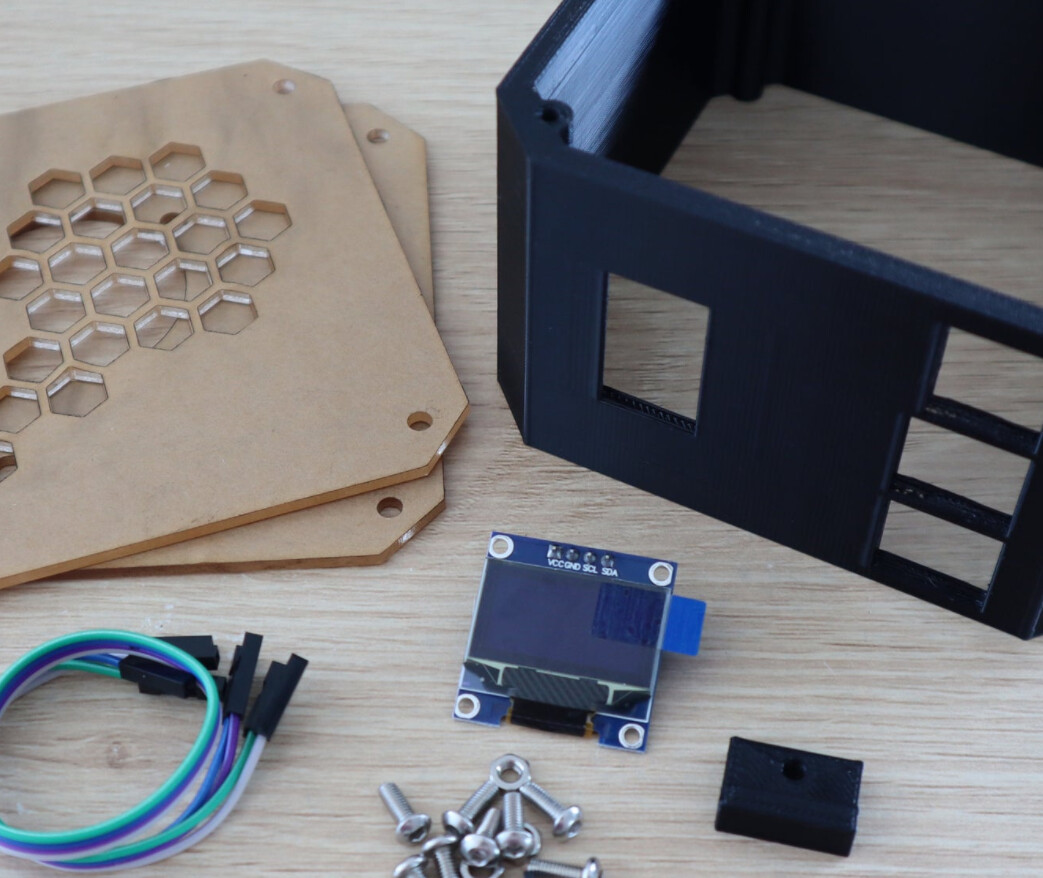
Please see below for details. Please note: Picture 1 is the product for sale here. Pictures 2, 3 & 4 are for reference only and show the finished product, which requires the additional components mentioned below.
With this kit, in addition to a Raspberry PI 4B an Ice Tower and your choice of micro SD card (Raspberry PI 4B, Ice Tower and Micro SD card not included / sold separately)
you will be able to build a fully functioning standalone desktop computer. We specifically love this case and use it mainly for Chris Edwards awesome PiMiga Commodore Amiga emulation solution. If this is of interest to you, please consider getting in touch with Chris, making a donation and enjoying a system that he's put a lot of hard work into, allowing users to enjoy a high end Amiga experience on low cost hardware. - In reality, this case can be used to run anything you wish from the Raspberry Pi.
The case utilises the repositioned fan from the Ice Tower(sold separately) to provide cooling and the included mounting brackets to attach the Raspberry Pi within this case.
The OLED display on the front of the case, can be configured to display anything you wish. For example, to display the Raspberry Pi's IP address and some additional statistics, please refer to the included instructions.
Via the front of the case, you can easily access the Ethernet / Network and USB ports. Power, Audio and 2 x HDMI ports are accessed via the side panel.
Through the back of the case, there is an optional push out blanking plate, allowing access to the SD card slot.
Here are the step by step instructions to put your case together - https://www.the-diy-life.com/diy-raspberry-pi-4-de...Here are the instructions, to configure the OLED screen to display the Raspberry Pi statistics on a stock Linux installation. - https://www.the-diy-life.com/connect-and-program-a...
There are a few extra steps required when following the above instructions, to get the OLED screen working on a PiMIGA build vs. a normal stock Linux distro. Please check out the 'how-to' video on our You Tube channel link below, for more details:
https://www.youtube.com/channel/UCnN0YhlDq2YhKfzIX...
Case Dimensions:
External - 100mm x 100mm x 64mm
Internal - 92mm x 92mm x 60mm
Each Case & Display Kit Includes
- 3D Printed Housing & Display Clip
- 2 x Acrylic Laser Cut Sides
- I2C OLED Display Module
- 15cm Display Connector Cable
- 8 x Button Head Screws For The Side Panels
- 4 x Nuts For The Fan
- Display Screw
You will need a basic hex key set to install the screws and a small wrench or needle-nose pliers to install the brass standoffs which come with the Ice Tower
(Ice Tower Sold Separately)
RetroEZ is a community orientated online store, focused on helping people of all levels enjoy the retro gaming computer experience
Categories
Contact Info
07450 898847
hello@retroez.com
66 Alfreton Road, Newton
Derbyshire
DE55 5TQ
United Kingdom
Adrian Bolton T/A Retro EZ


